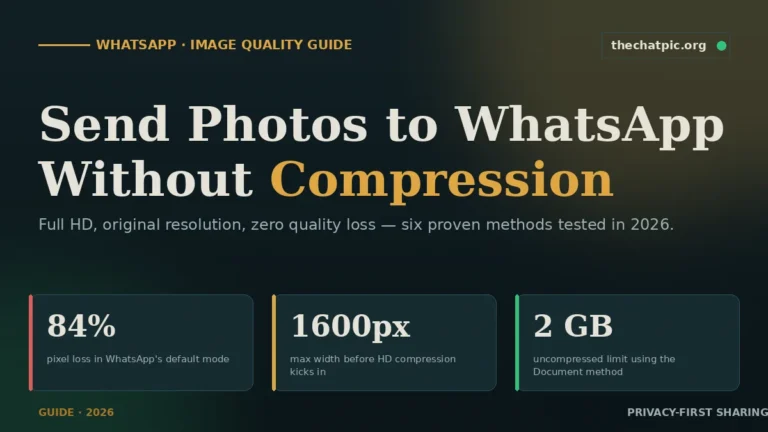
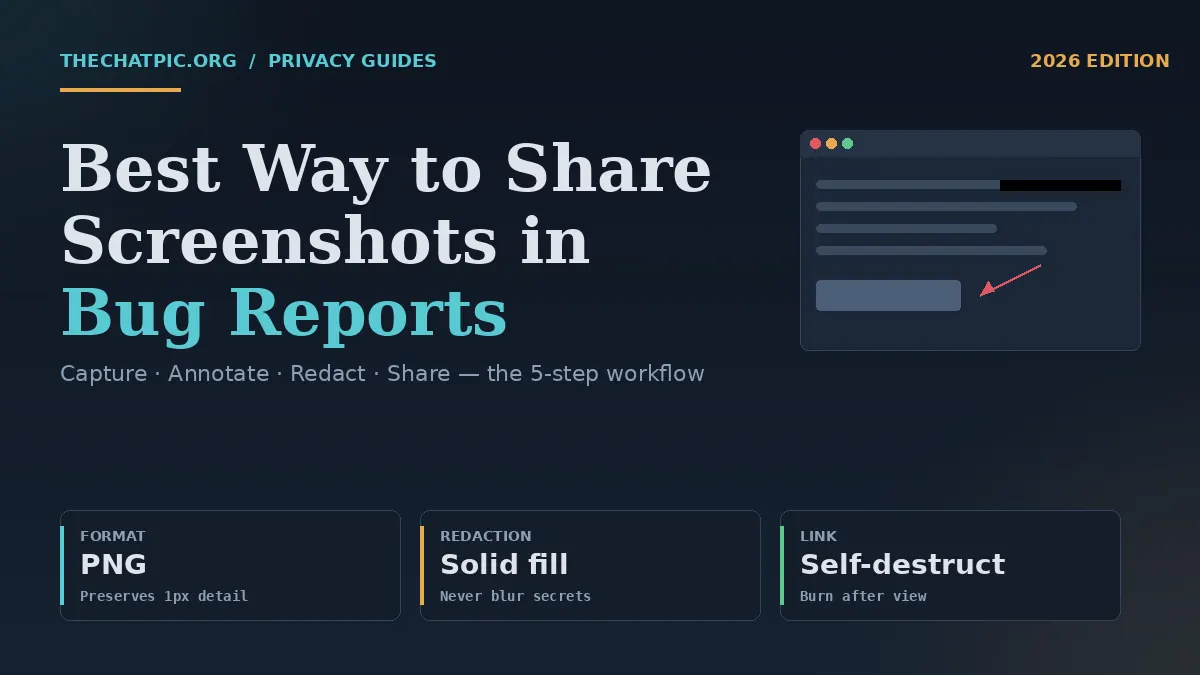
Best Way to Share Screenshots in Bug Reports (2026)
A bad screenshot in a bug report wastes everyone’s time. The developer opens the ticket, squints at a blurry crop, can’t tell which button is broken, and replies with “can you send a clearer one?” Two days later, the bug is still open.
After triaging thousands of tickets across QA teams, support queues, and open-source repos, I’ve found the same five-step workflow fixes 90% of the friction. Capture the right area, annotate the actual issue, scrub anything sensitive, host it so the link opens for everyone, and attach it with enough context that the developer can act without asking a single follow-up question.
This guide walks through that workflow, the tools that fit each step, and the mistakes that quietly slow your team down.
What “Best” Actually Means for a Bug Report Screenshot
A good bug report screenshot does three jobs at once: it proves the bug exists, it shows exactly where, and it gives the developer enough context to reproduce it without guessing.
That sounds obvious until you look at real tickets. Most attached screenshots fail at least one of those jobs. A full-monitor capture buries the issue in noise. A tightly cropped image loses the surrounding UI a developer needs to find the element in code. A JPEG of a 1-pixel border bug compresses away the very pixels under discussion.
The “best” workflow isn’t about the most powerful tool. It’s about matching format, framing, and delivery to what the person fixing the bug actually needs. A frontend engineer debugging a layout issue at 1440px wide needs a PNG at that exact width with the browser chrome visible. A support agent forwarding a customer complaint needs a redacted image — no account numbers, no email addresses, no session tokens in the URL bar.
Get the format right and the sharing method right, and bug fix cycles measurably shorten. Effective bug reports are crucial to software development and help ensure high-quality products. When writing a bug report, include detailed reproduction steps, screenshots and video recordings, system information, and expected vs. actual results. The screenshot is the load-bearing piece of evidence inside that report — treat it as such.
The 5-Step Workflow to Share a Screenshot in a Bug Report
Every screenshot that ships with a bug ticket should pass through the same five steps. In my testing across Jira, GitHub Issues, Linear, and ClickUp, this sequence cuts back-and-forth questions by roughly half.
Step 1 — Capture the Right Area at the Right Resolution
Take the screenshot at the actual resolution the bug occurs at. Do not resize, do not screenshot a zoomed-out browser, and do not photograph your monitor with your phone.
On macOS, use Cmd + Shift + 4 for an area selection, or Cmd + Shift + 5 for the full toolbar with video options. On Windows 11, Win + Shift + S opens the Snipping Tool overlay. On Linux, gnome-screenshot -a or Flameshot give you the same area-select behaviour with built-in annotation.
Capture enough surrounding UI that the bug is locatable without context. A button bug should include the section header and at least one neighbouring element. A layout issue should include the viewport edge so the width is implied. One screenshot per issue — if you have three bugs, attach three captures.
Save as PNG. JPEG compression degrades fine details — misaligned borders, incorrect colors at 1px precision, and subtle font rendering differences are exactly the things that matter in a UI bug report. JPEG can make these invisible. PNG preserves them.
Step 2 — Annotate the Actual Issue
The developer should see what’s wrong in under two seconds. Annotation is how you close that gap.
Use one arrow, one box, or one circle pointing directly at the broken element. Add a short label only if the issue isn’t visually obvious (a null value where text should be, a misaligned border at the pixel level, a colour contrast failure). Resist the urge to draw five arrows on one screenshot — split it into multiple captures instead.
Good annotation tools that handle this cleanly without sending data through a third-party server include Skitch, Greenshot (Windows, free), Shottr (macOS), and Flameshot (cross-platform). Each lets you capture, arrow, label, and copy the annotated image to clipboard in one keystroke chain.
Avoid the temptation to write a paragraph of explanation on the image itself. Words belong in the ticket body where they are searchable, translatable, and editable. The image carries visual evidence.
Step 3 — Redact Anything Sensitive Before You Share
This is the step almost everyone skips, and it is the most expensive one to skip. A single bug screenshot can leak API keys, customer email addresses, internal URLs, session tokens visible in DevTools, employee names, billing information, or partial credit card numbers.
Before you attach anything, scan the frame for: visible email addresses in the UI, account or order IDs, JWT tokens in the network tab, internal admin URLs, customer names, and anything in your browser’s tab title or bookmark bar.
Redact by drawing a solid black or grey rectangle over the sensitive area in your annotation tool. Do not blur — modern image-recovery techniques can sometimes reverse Gaussian blur on short strings. A solid fill cannot be reversed.
If you’re working with screenshots that may contain regulated data — health records, payment card numbers, anything covered by HIPAA, PCI-DSS, or GDPR — escalate to your security team’s approved workflow rather than attaching to a public tracker. A screenshot in a bug ticket is forever.
Step 4 — Host the Image So the Link Opens for Everyone
There are two real options for delivering the screenshot to your team: attach the file directly to the issue tracker, or upload it to an image host and paste the link.
Direct attachment works when your tracker accepts the file size, your team is on a single instance, and the screenshot has no sensitivity issues. Jira Cloud, GitHub Issues, Linear, and ClickUp all support drag-and-drop attachments. The downside: the image is locked behind that tracker’s auth, so external contractors, vendors, or open-source contributors can’t always see it.
A hosted link sidesteps the auth problem and works across every tool. The link previews inline in Slack, Discord, Notion, email, and most modern trackers, and you can paste it into a follow-up DM without re-uploading. The catch is choosing a host that doesn’t introduce its own problems — ads on the viewer page, mandatory accounts, indefinite retention of sensitive frames, or hidden EXIF data travelling with the upload.
For the link route, you want a host that strips metadata, lets you set an expiry, and ideally lets the link self-destruct after a single view. The ChatPic tool on the homepage handles all three by default and returns a short link plus a QR code in under five seconds. Drag the PNG in, pick a 1-day or 1-week expiry depending on how long the ticket will likely stay open, and paste the link into the ticket body. For sharing into specific channels, our Discord image sharing guide covers inline previewing, and the Reddit posting guide covers public-thread etiquette.
Step 5 — Attach With Context the Developer Can Act On
The screenshot is one input. The ticket needs the rest. A minimum-viable bug report alongside the image:
- Title: one sentence describing the broken behaviour, not the suspected cause.
- Environment: browser + version, OS, viewport width, build or commit hash.
- Steps to reproduce: numbered, starting from a known state.
- Expected vs actual: what should happen, what happens instead.
- Screenshot link or attachment: placed inline next to the relevant step.
If you’re testing a web-based application, copy and paste the URLs for each issue you come across. URLs often contain bits of data that can help developers diagnose issues at a low level. Paste the URL into the ticket body — redacted if it contains a customer ID — not just into the screenshot frame.
Tools and Methods Compared
There’s no single tool that does every step well. The realistic pattern is one tool for capture and annotation, a second for redaction (often the same one), and a third for hosting if you’re not attaching directly. Here’s how the main options stack up for the sharing step specifically.
| Method | Best for | Strengths | Trade-offs |
|---|---|---|---|
| Direct attachment (Jira, GitHub, Linear) | Internal-only tickets, small files | No third party, lives with the ticket, simple permissions | Locked behind auth, file-size caps, harder to share into Slack/DMs |
| ChatPic (thechatpic.org) | Cross-tool sharing with sensitive frames | Auto EXIF removal, expiry control, self-destruct, no signup, QR code, free | 5 MB per image, no team dashboard |
| Imgur | Public bugs, open-source issues | Long-lived links, recognised by most platforms, large user base | No metadata stripping, public discovery, no expiry, ads on viewer |
| Cloud screenshot apps (CloudApp/Zight, Droplr, Snagit cloud) | Team workflows with billing | Library, annotations, team folders, link history | Paid for serious use, account required, vendor lock-in |
| GitHub Gist / asset upload | Open-source repos, code-adjacent bugs | Lives with the project, version-controlled context | Public unless private gist, no expiry, file-size limits |
| Loom / video tools | Intermittent or interaction bugs | Captures the sequence, narration possible | Heavier than needed for static UI bugs, requires viewing time |
I found that the right combination for most teams is: capture and annotate in Flameshot, Shottr, or Snagit; redact in the same tool with a solid black rectangle; upload to ChatPic with a 1-week expiry when the bug touches anything sensitive, or attach directly to the tracker when it doesn’t.
One workflow detail that often gets missed: when a screenshot includes credentials, an internal URL, or a customer’s session, set the link to self-destruct after view. The developer opens it once, the link dies, and there is no lingering copy on a third-party server for a future breach to expose. For higher-stakes environments — security tickets, infrastructure issues, anything tied to a paying customer — combine that with a network layer per our Tor and VPN upload guide.
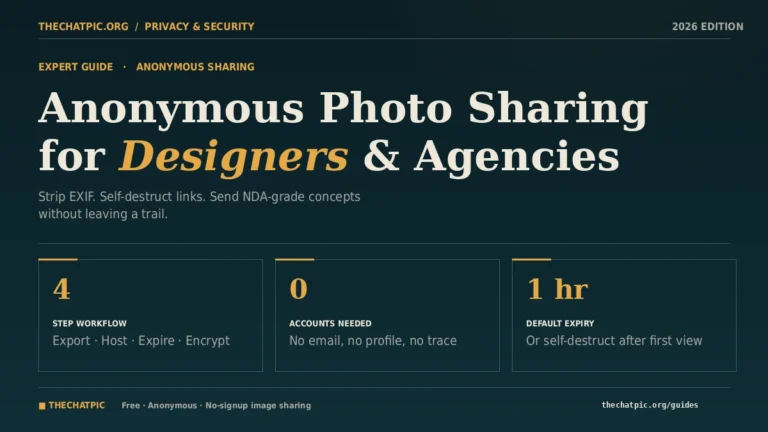
For more on what to redact and why, the broader privacy and security guides cover image-specific risks in detail. Designers sharing mockup or staging-site screenshots can apply the same redaction habits — our guide to anonymous photo sharing for designers and agencies covers the creative-work angle.
Common Mistakes That Slow Down Bug Fixes
These are the screenshot-sharing patterns that come up over and over in poorly triaged backlogs. Each one is a one-line fix.
Sending a phone photo of a monitor. Pixels are blurred, colours are off, glare ruins half the frame. Use the OS screenshot shortcut every time, even if it takes ten extra seconds. There is no bug small enough to justify a phone photo.
Cropping too tightly. A 200×80 crop of “the broken button” with no surrounding UI is useless. The developer can’t tell which page, which modal, or which state. Leave 100–200 pixels of context on each side.
Cropping too loosely. A full 4K monitor capture for a single dropdown bug buries the issue. Crop to the relevant section plus surrounding context — usually a browser tab, panel, or modal.
JPEG everywhere. Defaults on many tools save as JPEG. For UI bugs, switch to PNG in your tool’s settings once and forget it. The file size penalty is trivial; the clarity gain is large.
Blurring sensitive text instead of redacting it. A Gaussian blur over an eight-character token is sometimes reversible. Solid fill is not. Use a black rectangle.
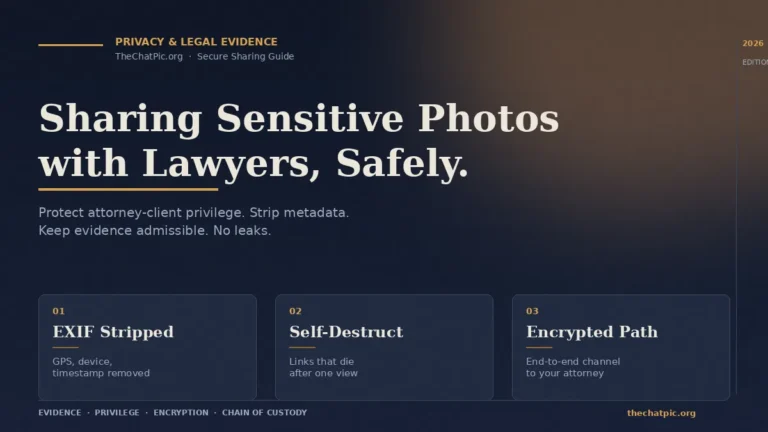
Sharing a link that requires a login. A Google Drive screenshot with default sharing set to “people in your org” locks out the contractor fixing the bug. Either set explicit anyone-with-link access or use a hostless tool. If you’ve already shared a sensitive frame and need to take it down, our permanent deletion guide walks through the cleanest options for ChatPic uploads, and the principle generalises: set expiry at upload time, don’t trust “delete” buttons added later. Freelancers and contractors filing tickets for clients should also see how freelancers share client work securely.
Posting one screenshot for three separate bugs. Each bug deserves its own ticket and its own image. A combined screenshot with three numbered arrows is harder to prioritise, harder to assign, and harder to close.
Forgetting the environment. A screenshot without browser version, OS, and viewport width forces the developer to ask. Paste it as text in the ticket body, not just baked into the image.
Treating the link as permanent. If you uploaded to a public host, the image may sit there forever. For anything that touched a customer or a credential, default to short expiry or self-destruct.
Skipping the dark-mode case. If your app supports dark mode and the bug only reproduces in one theme, capture both. UI bugs hide in theme-switch gaps more often than people expect.
Frequently Asked Questions
What format should I use for bug report screenshots?
PNG, always. JPEG compression smudges the 1-pixel detail that UI bugs depend on — misaligned borders, anti-aliasing artifacts, and small colour differences disappear. PNG keeps every pixel intact at a file size that any tracker or host will accept. Switch the default in your screenshot tool once and forget it.
Should I attach screenshots to the ticket or share a link?
Both work, and the choice depends on your team. Direct attachment is simpler when everyone has tracker access and the file is small. A hosted link is better when you also need to share into Slack, DMs, or with external contributors. For sensitive screenshots, a link with an expiry or self-destruct setting beats a permanent attachment.
How do I share screenshots that contain customer data or credentials?
Redact first with a solid black rectangle — not a blur — over any visible email, account ID, token, or URL. Then upload to a host that strips EXIF metadata and supports self-destruct links, like the tool at thechatpic.org. Set the link to die after one view, and never paste it into a public channel.
What’s the best free tool to capture and annotate bug screenshots?
For Windows, Greenshot and Flameshot are both free and handle area capture, arrows, boxes, and redaction in one window. On macOS, Shottr is free for personal use and faster than the built-in tools. Cross-platform, Flameshot is the most consistent. None require an account or upload anything by default.
Why do my screenshots leak GPS or device info?
Photos taken on phones carry EXIF metadata — GPS coordinates, device model, exact timestamp — embedded in the file. Desktop screenshots usually don’t, but anything routed through a phone might. Hosts that auto-strip metadata, like ChatPic, remove this on upload. If you’re attaching the raw file to a tracker, run it through a metadata-removal tool first.
Is it safe to use Imgur for work bug reports?
For public, non-sensitive issues — open-source bugs, community forum posts, public Stack Overflow questions — Imgur works fine. For anything with customer data, credentials, internal URLs, or proprietary UI, it’s the wrong choice: links don’t expire, the viewer page carries ads, and there’s no metadata stripping. Use a privacy-first host for work screenshots.
How long should a bug report screenshot link stay live?
Match the link’s lifespan to the ticket’s lifespan, then add a buffer. For a quick UI bug that’ll close in a day, a 1-day or 1-week link is fine. For long-running issues, a 1-week link with a re-upload if needed is safer than a permanent link. For sensitive frames, set self-destruct and re-share to anyone who needs a second look.
Can I share a video instead of a screenshot for a bug?
Yes, and for intermittent or interaction-based bugs you should. A 10–20 second screen recording showing the click sequence saves the developer from guessing the trigger. Loom, CleanShot X, and the built-in macOS screen recorder all work. For static UI issues, a screenshot is still faster to capture and faster to review.
Conclusion
The best way to share screenshots in bug reports isn’t a single tool — it’s a five-step habit. Capture at native resolution, annotate one issue per image, redact anything sensitive with a solid fill, host on something that respects privacy and expiry, and attach with the environment context a developer needs.
Make it the default for your team and the back-and-forth on tickets drops measurably in the first week. The single biggest leverage point is the redaction-and-link step: stop attaching raw, permanent files to public trackers, and start sending clean, expiring links instead.
Try the workflow with your next bug ticket. Capture the issue, annotate it, and drop the PNG into the ChatPic tool on the homepage with a 1-week expiry — or self-destruct if it’s sensitive. Paste the short link into your tracker, add your steps to reproduce, and watch how much faster the developer responds.